It turns out that ZSNES has a video dumping facility. Unfortunately, all of its presets are crap and it wants to dump the video out as YUV, which looks horrible. And you need to download MEncoder, which can be hard to find.
Fortunately, it turns out that the raw video dump dumps RGB (well, BGR - more on that later) frames, and can be used to create an AVI through AviSynth, with the help of an AviSynth plugin called Sashimi. (It deals with raw movie files. Get it? Raw? Hah!)
First off, a bit of terminology: for the sake of this blog post, "movie" means "ZSNES movie," a.k.a. a "controller movie" or "keystroke movie" - this is a movie file (the ZMV) that plays only is ZSNES. "Video" means a video file like an AVI or MP4 file that can be played in video players.
Secondly, I'm going to assume you already have a ZSNES movie recorded, and that you don't need help with that. There are other guides out there for dealing with creating ZSNES movies.
So, once you have your movie recorded, go back to "Misc" and "Movie Opt" and click on the "Dumping" tab at the top. You should see a screen like this:
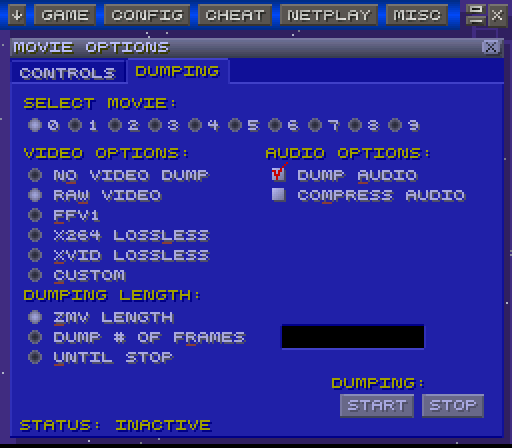
Make sure that "Raw Video" is selected. If you want sound, you want to make sure "Dump Audio" is checked. When ready, hit the Start button and wait until the movie is done playing. (Yes, you must watch it in real time. ZSNES will cope with the movie encode taking longer than it would to play back in real time, but not taking less time. This feature was added six years ago, after all.)
Note that this will create enormous files: a test two minute video clocked in at around 1 GB. Exporting that to Lagarith dropped that to around 165MB.
Now you'll have two files (if you dumped audio) in the ZSNES directory: audio.wav and rawvideo.bin. (You can configure where these files are saved using zmovie.cfg, but be warned there's a maximum character limit on the path.)
Sadly, rawvideo.bin is mostly useless, as you need to find something that can read it back and make a non-raw ("cooked") video out of it. Enter AviSynth with Sashimi. A simple AviSynth script will handle loading the video:
LoadPlugin("Sashimi\Sashimi.dll")
RawReader("rawvideo.bin", "BGR", 256, 224)

AssumeFPS(59649, 995) # For NTSC
# Why not AssumeFPS("ntsc_double")? Not sure, but it doesn't work.
# AssumeFPS(50, 1) # For PAL
# AssumeFPS("pal_double") would also work for PAL

AudioDub(WAVSource("audio_fixed.wav"))
Couple of things to note. First off, the LoadPlugin line should be wherever you saved your "Sashimi.dll" file. Secondly, you'll note that you need to pick the appropriate AssumeFPS line for your ROM - raw means raw: only the individual frames are saved, not any metadata including frame size or pixel format. All that data has to be saved in the AVS instead.
And, finally, the important bit. You might notice that instead of using audio.wav directly, I'm using audio_fixed.wav. Why? Because, for whatever reason, the WAV as saved by ZSNES doesn't work with AviSynth (or, rather, whatever AviSynth uses to load WAVs). So instead I have to load it into Audacity and re-export it as a WAV. This fixes it, for whatever reason.
With that done, you have your audio/video file! You can then load the AVS into MeGUI or VirtualDub or whatever you're using to deal with AVS.
Plus, you can throw in other filters. For example:
PointResize(512, 448)
ConvertToYV12()
Now, you might want to know why I'd go through all this trouble to get the data as RGB if I'm just going to convert to YV12 at the end anyway. For your answer, see wht happens if you invert those two filters:

Resized, then converted to YV12

Converted to YV12 and then resized
Because YV12 uses "chroma subsampling," blowing up the movie after the conversion actually causes data to be lost. Blowing it up first and then converting it makes it look nice. (Specifically, compare the red elements on X's helmet in the first and second screen shots.)